
How To Erase Duplicate Photos on Windows 10 in 2 Ways

Having a lot of duplicate photos on your computer can be really confusing and frustrating. It is because duplicate photos reduce your work efficiency as well as create confusion side by side. One of the ways to delete duplicate photos is to go through all the folders one by one and locate your duplicate photos but this is a tiresome process. We are sure you are not looking for the method of finding duplicate photos by searching every folder manually and deleting them one by one.
This is why we will elaborate here some of the best duplicate photo finder using which you can find and clean duplicate photos efficiently. While we explain to you the ways to delete duplicate photos, a good tool must be capable of scanning the images quickly, must provide the flexibility of keeping images or scanning only particular folders and allows previewing of images before finally deleting them. Keeping that in mind, here are the best ways to find duplicate photos and erase them instantly to make space in the computer.
Erase Duplicate Photos On Windows
Method 1: Using Duplicate Photos Fixer Pro
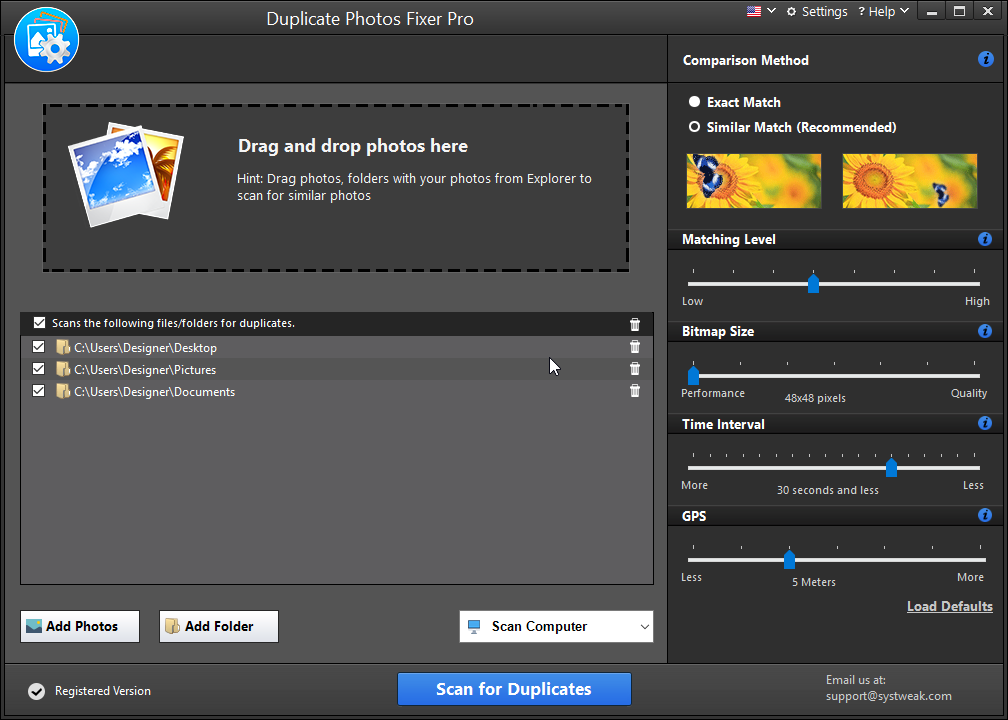
Duplicate Photos Fixer Pro is one of the best tools to delete unwanted and unnecessary duplicate photos present in the computer. It offers great customization using which you can decide the degree of matching level, bitmap size or GPS. Moreover, it also fulfills the criteria of previewing the photos before actually deleting them. So how to remove duplicate photos from the computer using Duplicate Photos Fixer Pro? Let’s find it out.
Step 1: Download and install Duplicate Photos Fixer Pro in your computer from its official website.
Step 2: Launch the software. Now drag and drop the folders here or just click ‘Add Photos’ or ‘Add Folder’ to begin the process.
Step 3: As soon as the photos or folders are added, you can drag the matching level, bitmap size, time interval and GPS. Plus, you can decide if you want to find exact matches or similar matches.
Step 4: Now click the ‘Scan for duplicates’ button and you will be able to see the tool finding duplicate photos for you.
Step 5: All the duplicate photos will appear on the screen in different groups. You can automark the duplicates using which one photo will be kept and the other will be erased.
Step 6: Click the ‘Delete Marked’ button and the duplicate photos will be erased completely.
Alternatively, you can try downloading Duplicate Files Fixer as it is capable of finding not just duplicate photos but also other files like documents, audio files, video files and other archives. The best part is that it works exactly as a Duplicate Photos Fixer without the degree but helps in saving a lot of space in the system. Hence, one who wishes to find other duplicate files too apart from duplicate photos can totally work upon this tool.
Method 2: Using Duplicate Sweeper
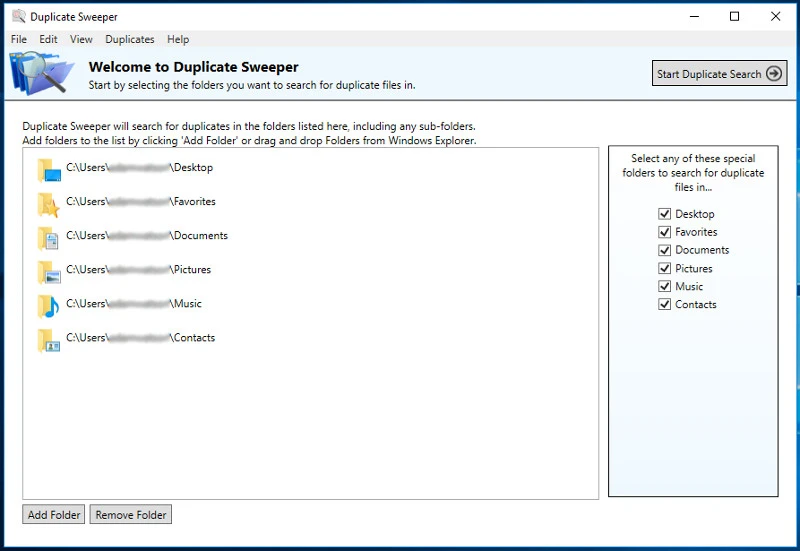
Another great piece of deleting duplicate photos, it can find and remove duplicate photos very easily. For this, follow the steps to begin the process.
Step 1: Download and install Duplicate Sweeper on your computer.
Step 2: The installer will itself explain the necessary steps to install and then launch the tool.
Step 3: Click the ‘Add folder’ button in order to add folders or scanning. One can drag and drop the folders here too.
Step 4: Click ‘Start Duplicate Search’ to begin the search.
Step 5: Once the scanning finishes, check the heading of Duplicate Groups to review all the duplicate files. The group which you want to remove, tick mark ‘Keep all the newest files’ option so that oldest files can be removed and new ones can be kept.
Step 6: Review your selection and finally click ‘Recycle duplicates’ for confirmation.
This will mostly remove all the duplicates present within the computer. Moreover, it also removes documents, music and contacts apart from the duplicate photos.
Wrap Up
We hope that you have figured out how to find duplicate photos and erase them from your computer using two different methods here. Moreover, the first method is highly recommended to you from our end because of its broad explanation of finding duplicates, auto marking duplicates as well as saving space in the computer. Moreover, the tool is also designed for modern requirements with a modern interface. At the same time, the second tool is also good to work but designed in an older fashion. Through this blog, let us know which of the above tool looks good to you and why? Share your blogs with us in the comments below.
Also Read: pizza box computer